FTP server is used to exchange files between computers over network . This guide helps you to setup ftp server on centos 7 . This guide contains configuration steps for both FTP and SFTP as well as user creation . Here i've used VSFTP package which is secure and less vulnerable .
2. SFTP Server
3. User creation
Setup FTP server on centos 7
Step 1 » Update your repository and install VSFTPD package .[root@krizna ~]# yum check-update
[root@krizna ~]# yum -y install vsftpd
Step 2 » After installation you can find /etc/vsftpd/vsftpd.conf file which is the main configuration file for VSFTP.
Take a backup copy before making changes .[root@krizna ~]# mv /etc/vsftpd/vsftpd.conf /etc/vsftpd/vsftpd.conf.orgNow open the file and make changes as below[root@krizna ~]# nano /etc/vsftpd/vsftpd.confFind this line anonymous_enable=YES ( Line no : 12 ) and change value to NO to disable anonymous FTP access.anonymous_enable=NOUncomment the below line ( Line no : 100 ) to restrict users to their home directory.chroot_local_user=YESand add the below lines at the end of the file to enable passive mode and allow chroot writable.allow_writeable_chroot=YES
pasv_enable=Yes
pasv_min_port=40000
pasv_max_port=40100
Step 3 » Now restart vsftpd service and make it start automatically after reboot.[root@krizna ~]# systemctl restart vsftpd.service
[root@krizna ~]# systemctl enable vsftpd.service
Step 4 » Add FTP service in firewall to allow ftp ports .[root@krizna ~]# firewall-cmd --permanent --add-service=ftp
[root@krizna ~]# firewall-cmd --reload
Step 5 » Setup SEinux to allow ftp access to the users home directories .[root@krizna ~]# setsebool -P ftp_home_dir on
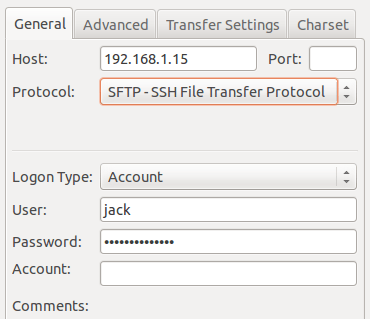
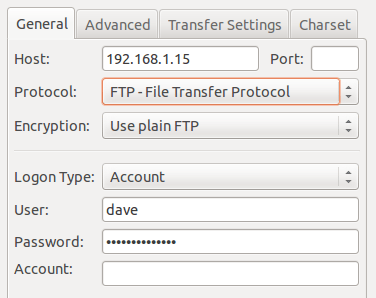
Step 6 » Now create an User for ftp access. Here /sbin/nologin shell is used to prevent shell access to the server .[root@krizna ~]# useradd -m dave -s /sbin/nologinNow user dave can able to login ftp on port 21 .
[root@krizna ~]# passwd dave
You can filezilla or winscp client for accessing files.
SFTP server
SFTP ( Secure File Transfer Protocol ) is used to encrypt connections between clients and the FTP server. It is highly recommended to use SFTP because data is transferred over encrypted connection using SSH-tunnel on port 22 .
Basically we need openssh-server package to enable SFTP .
Install openssh-server package, if its not already installed.[root@krizna ~]# yum -y install openssh-server
Step 7 » Create a separate group for FTP access.[root@krizna ~]# groupadd ftpaccess
Step 8 » Now open /etc/ssh/sshd_config file and make changes as below.
Find and comment the below line ( Line no : 147 ).#Subsystem sftp /usr/libexec/openssh/sftp-serverand add these lines below.Subsystem sftp internal-sftp
Match group ftpaccess
ChrootDirectory %h
X11Forwarding no
AllowTcpForwarding no
ForceCommand internal-sftp
Step 9 » Now restart sshd service.[root@krizna ~]# systemctl restart sshdNow your SFTP server is configured and ready .
User creation
Step 10 » Create user jack with /sbin/nologin shell and ftpaccess group[root@krizna ~]# useradd -m jack -s /sbin/nologin -g ftpaccessNow assign root ownership for the home directory for chroot access and modify permission.
[root@krizna ~]# passwd jack[root@krizna ~]# chown root /home/jackCreate a directory www inside home directory for writing and modify ownership .
[root@krizna ~]# chmod 750 /home/jack[root@krizna ~]# mkdir /home/jack/www
[root@krizna ~]# chown jack:ftpaccess /home/jack/www
Now jack can use both ftp and sftp services . He can upload files in www directory .
If you are going to use FTP and SFTP together in the same server, you should follow above steps while creating users . For existing users add them to ftpaccess and make below changes.[root@krizna ~]# usermod dave -g ftpaccess
[root@krizna ~]# chown root /home/dave
[root@krizna ~]# chmod 750 /home/dave
[root@krizna ~]# mkdir /home/dave/www
[root@krizna ~]# chown dave:ftpaccess /home/dave/www